"新生必讀文件/en" 修訂間的差異
小 |
|||
| (未顯示由 3 位使用者於中間所作的 43 次修訂) | |||
| 行 1: | 行 1: | ||
=Terminal Room= | =Terminal Room= | ||
| − | + | As a freshman of National Central University, everything around here must be new and fresh to you! National Central University Computer Center (NCUCC) with various services is a good helper for every student, especially for those who are new to here. If you have any of the following questions: Where can I get online? Where can I print or scan my works? What resources do NCU have? Maybe you will need to get known with NCUCC. Please take a look around and find out what services do we provide. | |
| + | |||
==Services== | ==Services== | ||
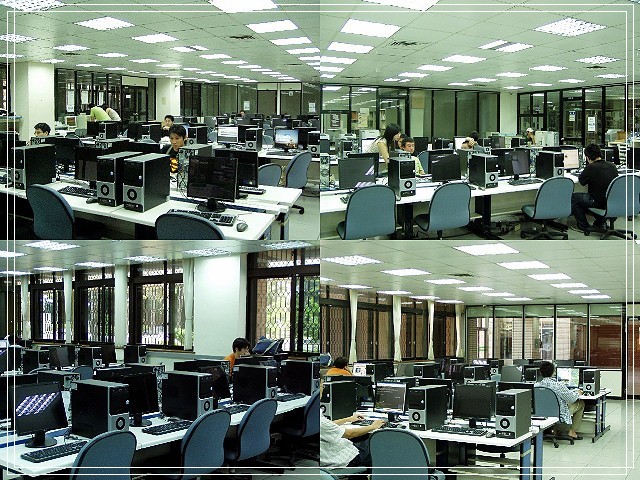
| − | :<b>1.Terminal Room</b>:About 100 computers are available for staffs and students of NCU. For temporary user, | + | :<b>1.Terminal Room</b>:About 100 computers are available for staffs and students of NCU. For temporary user, you must take a short registration at our Service Desk before using our computer. Two different types of operating system, Microsoft Windows XP and Ubuntu Linux, are pre-installed. |
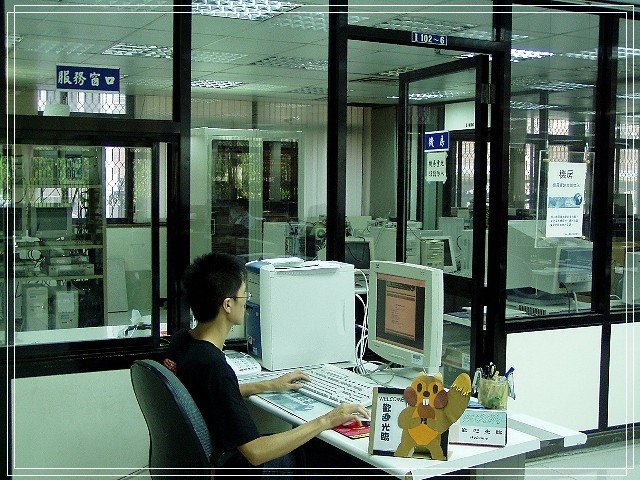
:<b>2.Service Counter in Terminal Room</b>:[[Image:serv1.jpg]] | :<b>2.Service Counter in Terminal Room</b>:[[Image:serv1.jpg]] | ||
:Trained professional students are in charge of environment supervision and any services provided in terminal room. | :Trained professional students are in charge of environment supervision and any services provided in terminal room. | ||
:For any other services, please refer to [[ServiceDesk]] | :For any other services, please refer to [[ServiceDesk]] | ||
| − | |||
| − | |||
:<b>3.Printing Service</b>:Two matrix-dot printers, two black-and-white laser printers and a color laser printer are now available in terminal room. | :<b>3.Printing Service</b>:Two matrix-dot printers, two black-and-white laser printers and a color laser printer are now available in terminal room. | ||
| 行 15: | 行 14: | ||
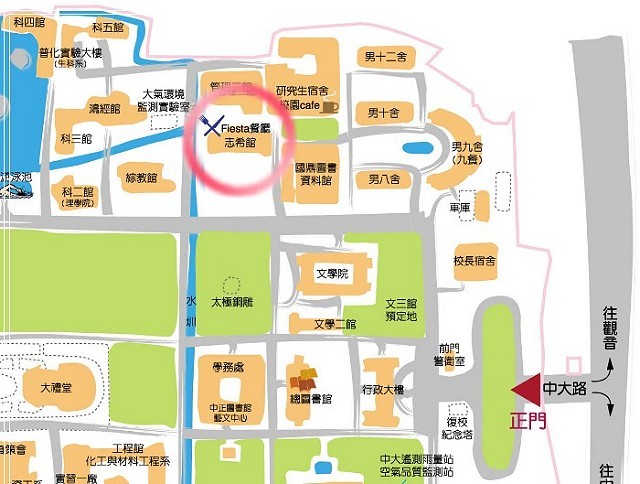
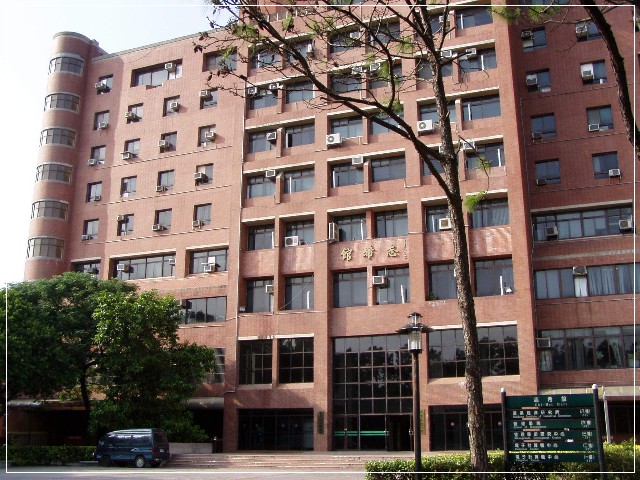
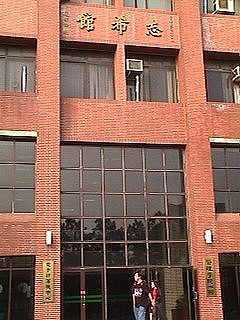
==Location== | ==Location== | ||
| − | :The location of terminal | + | :The location of terminal room: terminal room is located at the ground floor of Zhi-Xi Hall. Turn right after entering the main entrance of Zhi-Xi Hall and you will see terminal room. |
:[[Image:cc_map.jpg]] | :[[Image:cc_map.jpg]] | ||
| 行 30: | 行 29: | ||
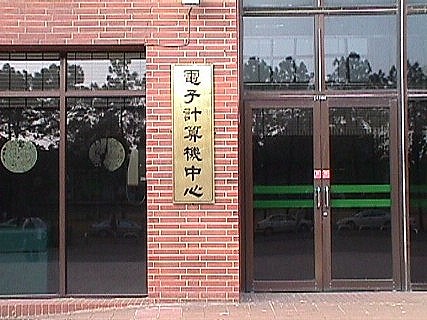
:[[Image:ncucc3.jpg]] | :[[Image:ncucc3.jpg]] | ||
| − | :Main | + | :Main Entrance of Computer Center |
| 行 71: | 行 70: | ||
::* Please shut down the computer properly and push the chair back after usage. | ::* Please shut down the computer properly and push the chair back after usage. | ||
| − | = | + | =NCU Mail= |
| − | + | [[https://support.mail.ncu.edu.tw NCU Mail Support]] | |
| − | |||
| − | |||
| − | |||
| − | |||
| − | |||
| − | |||
| − | |||
| − | |||
| − | |||
| − | |||
| − | |||
| − | |||
| − | |||
| − | |||
| − | |||
| − | |||
| − | |||
| − | |||
| − | |||
| − | |||
| − | |||
| − | |||
| − | |||
| − | |||
| − | |||
| − | |||
| − | |||
| − | |||
| − | |||
| − | |||
| − | |||
| − | |||
| − | |||
| − | |||
| − | |||
| − | |||
| − | |||
| − | |||
| − | |||
| − | |||
| − | |||
| − | |||
| − | |||
| − | |||
| − | |||
| − | |||
| − | |||
| − | |||
| − | |||
| − | |||
| − | |||
| − | |||
| − | |||
| − | |||
| − | |||
| − | |||
| − | |||
| − | |||
| − | |||
| − | |||
| − | |||
| − | |||
| − | |||
| − | |||
| − | |||
| − | |||
| − | |||
| − | |||
| − | |||
| − | |||
| − | |||
| − | |||
| − | |||
| − | |||
| − | |||
| − | |||
| − | |||
| − | |||
| − | |||
| − | |||
| − | |||
| − | |||
| − | |||
| − | |||
| − | |||
| − | |||
| − | |||
| − | |||
| − | |||
| − | |||
| − | |||
| − | |||
| − | |||
| − | |||
=Dormitory Network= | =Dormitory Network= | ||
| 行 179: | 行 84: | ||
#*It is forbidden to use network resources for mass mailing, mail bombing, sending spam, spreading viruses and users are not allowed to provide the means to the third parties to perform similar acts. | #*It is forbidden to use network resources for mass mailing, mail bombing, sending spam, spreading viruses and users are not allowed to provide the means to the third parties to perform similar acts. | ||
#*Any resources from the internet belong to the authorised parties. TANet users are forbbiden to access those resources unless any official permission or authorization is obtained. | #*Any resources from the internet belong to the authorised parties. TANet users are forbbiden to access those resources unless any official permission or authorization is obtained. | ||
| − | #[http://www.cc.ncu.edu.tw/document/rules-ncu | + | #[http://www.cc.ncu.edu.tw/document/rules-ncu/ 「Rules and Regulation of National Central University Networking 」] |
==How to Apply== | ==How to Apply== | ||
| 行 216: | 行 121: | ||
#'Registered': | #'Registered': | ||
#*Definition:Once a person finish the registration (including personal information, dormitory information and MAC address) on Dormitory Network System, the status is shown as 'registered'. | #*Definition:Once a person finish the registration (including personal information, dormitory information and MAC address) on Dormitory Network System, the status is shown as 'registered'. | ||
| − | #*To enable dormitory network, | + | #*To enable dormitory network, your status must be 'registered'. |
#'Activated': | #'Activated': | ||
#*Definition:Once a person finish the activation (that is, register a network activation code) on Dormitory Network System, the status is shown as 'activated'. | #*Definition:Once a person finish the activation (that is, register a network activation code) on Dormitory Network System, the status is shown as 'activated'. | ||
| − | #*The status of 'activated' show that | + | #*The status of 'activated' show that you has paid the fee for dormitory network. |
#*Your status must be 'registered' before you change to 'activated'. | #*Your status must be 'registered' before you change to 'activated'. | ||
#Grace Period of disabling dormitory network: | #Grace Period of disabling dormitory network: | ||
| 行 232: | 行 137: | ||
#It takes time to activate your dormitory network connection even though you have registered a network activation code. To avoid inconvenience, please register your network activation code before the end of grace period. | #It takes time to activate your dormitory network connection even though you have registered a network activation code. To avoid inconvenience, please register your network activation code before the end of grace period. | ||
| − | == | + | ==DHCP (Dynamic Host Configuration Protocol)== |
| − | #<b>Purpose: </b> With obtaining an IP address automatically, | + | #<b>Purpose: </b> With obtaining an IP address automatically, you are able to connect to Dormitory Network System before his/her dormitory network has been activated. After activating his/her dormitory network, you will obtain a unique IP address which should be used in the whole semester. |
| − | # The IP address obtained automatically has limited connection, that is, | + | # The IP address obtained automatically has limited connection, that is, you can connect to Dormitory Network System only. |
# The function "Dormitory IP Query" has been canceled. | # The function "Dormitory IP Query" has been canceled. | ||
| − | # After the dormitory network is activated, | + | # After the dormitory network is activated, you will obtain a unique IP address and related settings information. Please write down all the given settings and refer to section <b>[[#Network_Configuration]]</b>. |
#Configuration: obtain an IP address automatically | #Configuration: obtain an IP address automatically | ||
| 行 304: | 行 209: | ||
| − | : | + | :For Windows <b>Vista</b>, you can check your MAC address by the following steps: |
| − | :: | + | :: Click <b>Start</b>-> <b>All Programs</b>-> <b>Accessories</b>-> <b>Command Prompt</b>, as the picture below: |
| − | ::[[Image: | + | ::[[Image:vista1_en.jpg]] |
| − | :: | + | :: Type <b>ipconfig/all</b> in the command prompt window: |
::[[Image:vista2.gif]] | ::[[Image:vista2.gif]] | ||
| − | :: | + | :: the result is shown below: |
| − | :: | + | ::Physical Address is equivalent to MAC address (etc. :001731B3521E) |
| − | :: | + | :: Please note that <b>the accurate MAC address we needed should be in the same section with IPv4 address instead of IPv6 address</b>. |
| − | ::[[Image: | + | ::[[Image:vista3_en.jpg]] |
| − | :: | + | :: Write down MAC address as we will need this value for further registration. |
| 行 355: | 行 260: | ||
| − | :2. Log-in to system with your <b>NCUCC SPARC E-mail | + | :2. Log-in to system with your <b>NCUCC SPARC E-mail Account</b>. |
| − | :3. Click <b>Personal Info/b> and fill in your personal information. | + | :3. Click <b>Personal Info</b> and fill in your personal information. |
:[[Image:DormNetwork_eng03.jpg]] | :[[Image:DormNetwork_eng03.jpg]] | ||
| 行 365: | 行 270: | ||
:5. After filling all information, click <b>Save and Change</b>. The System will prompt you a confirmation message, please check again your information before clicking <b>OK</b>. | :5. After filling all information, click <b>Save and Change</b>. The System will prompt you a confirmation message, please check again your information before clicking <b>OK</b>. | ||
:[[Image:DormNetwork_eng04.jpg]] | :[[Image:DormNetwork_eng04.jpg]] | ||
| − | |||
===b.Register Your MAC Address=== | ===b.Register Your MAC Address=== | ||
| 行 403: | 行 307: | ||
| − | :2. Log-in to system with your <b>NCUCC SPARC E-mail | + | :2. Log-in to system with your <b>NCUCC SPARC E-mail Account</b>. |
| 行 453: | 行 357: | ||
::Cofiguration done. | ::Cofiguration done. | ||
| − | :<b>b. | + | :<b>b. Windows Vista</b> |
| − | :: | + | ::Click <b>Windows Start</b>><b>Control Panel</b>><b>View Network Status and Task</b>: |
| − | ::[[Image: | + | ::[[Image:vista4_en.jpg]] |
| + | ::Click <b>View Status</b>: | ||
| + | ::[[Image:vista5_en.jpg]] | ||
| − | |||
| − | |||
| + | ::Click <b>Properties</b>: | ||
| + | ::[[Image:vista6_en.jpg]] | ||
| − | |||
| − | |||
| + | ::1.Do not tick Internet Protocol Version6(TCP/IPv6), and tick Internet Protocol Version4(TCP/IPv4) | ||
| + | ::2.Click once on Internet Protocol Version4(TCP/IPv4) | ||
| + | ::3.Click <b>Properties</b> | ||
| + | ::[[Image:vista7_en.jpg]] | ||
| − | :: | + | ::<b>IP configuration:</b> Enter the unique IP and settings information which is obtained after activating your dormitory network. (A person should have a unique IP. Please make sure you configure your IP correctly) |
| − | :: | + | ::Configure <b>Subnet mask</b> as the picture below. The third column of <b>Default gateway</b> have exactly the same value with the third column of <b>IP address</b> |
| − | + | ::[[Image:vista8_en.jpg]] | |
| − | |||
| − | |||
| − | |||
| − | |||
| − | |||
| − | ::[[Image: | ||
| − | + | ※It takes about a day to activate your dormitory network after all configuration is done. | |
| − | + | If you do not complete all configurations within grace period, your network may be restricted in use. If so, get your MAC address and come to our terminal room, and you can finish all procedures needed for activating dormitory network at our terminal room. | |
| − | + | If all registrations and configurations are done, your dormitory network should be activated within a day.<b> Please note that your dormitory network will never been activated immediately. It takes time!</b> | |
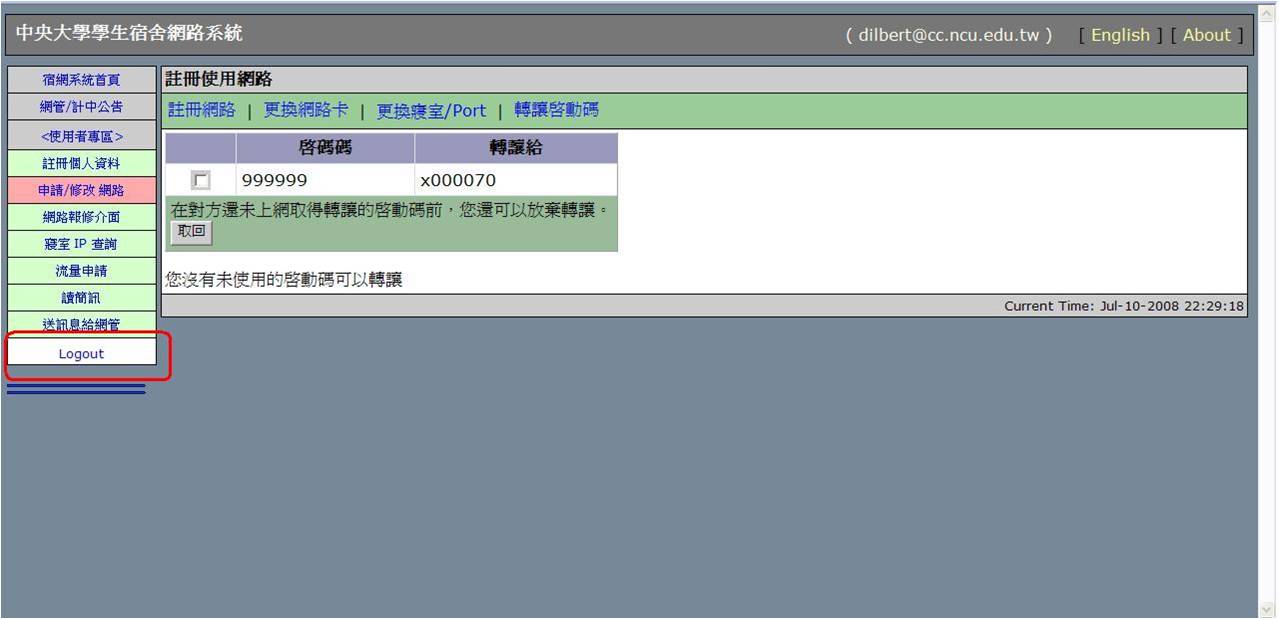
==Transfer a Network Activation Code (From Short Term User Account to Permanent NCUCC SPARC E-mail Account)== | ==Transfer a Network Activation Code (From Short Term User Account to Permanent NCUCC SPARC E-mail Account)== | ||
#Restriction on Use: | #Restriction on Use: | ||
| − | #* | + | #*You are allowed to transfer a network activation code from short term user account to permanent NCUCC SPARC E-mail Account only. |
| − | #*If | + | #*If you have registered for dormitory network by using short term user account(that is, you have registered dormitory number, port number on Dormitory Network System), you have to delete all the information registered in your short term user account (for following procedure, please refer to [[#e._Change_Room.2F_Port_information|3.8.5.e Change Room and Port Information]]). Only by doing so can you register the same information again in your new permanent SPARC E-mail account. |
| − | #* | + | #*All the registered information of summer or winter vacation shall be reset during school opening period. You are suggested to transfer your network activation code '''after school opened'''. |
#Procedure of transfering a network activation code: | #Procedure of transfering a network activation code: | ||
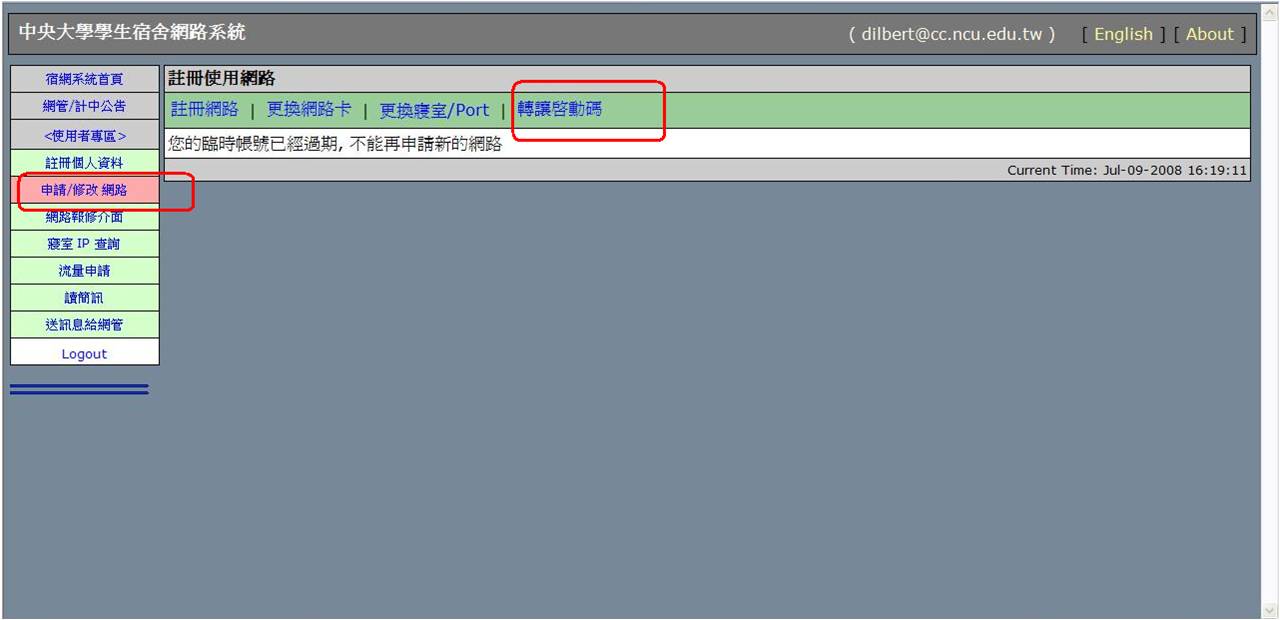
| − | ::2.1 Sign in Dormitory Network System with your short term user account. | + | ::2.1 Sign in Dormitory Network System with your short term user account. Click '''<User Area>''' >'''Registration'''>'''Give Away''' |
::[[Image:Transfer01.jpg]] | ::[[Image:Transfer01.jpg]] | ||
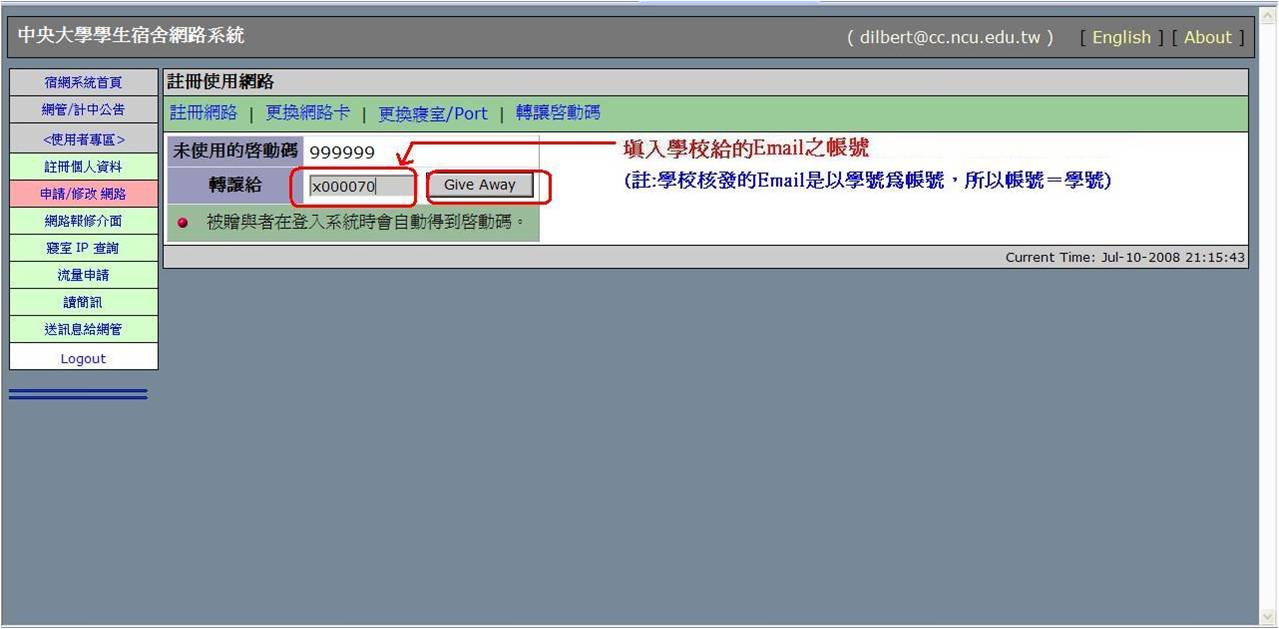
| − | ::2. | + | ::2.2 Enter the student ID you wish to tranfer to, then click '''Give Away''' |
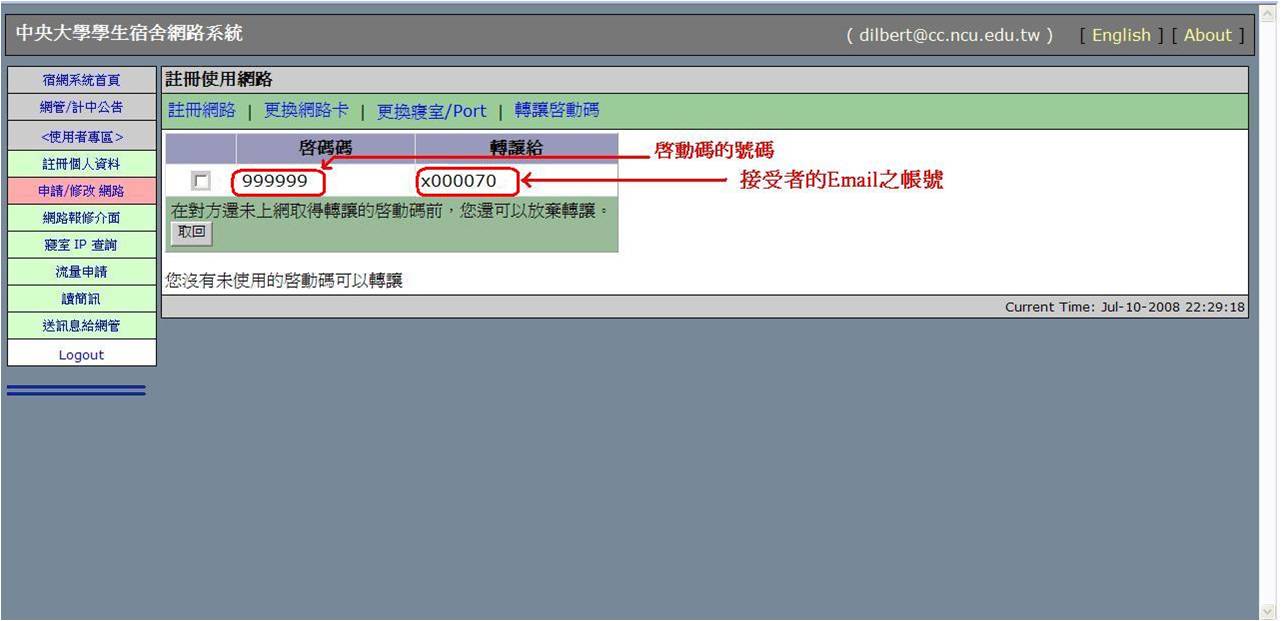
::[[Image:Transfer02.jpg]] | ::[[Image:Transfer02.jpg]] | ||
| − | ::2. | + | ::2.3 If you enter wrong student ID, you can cancel the transfer before you log out. |
::[[Image:Transfer03.jpg]] | ::[[Image:Transfer03.jpg]] | ||
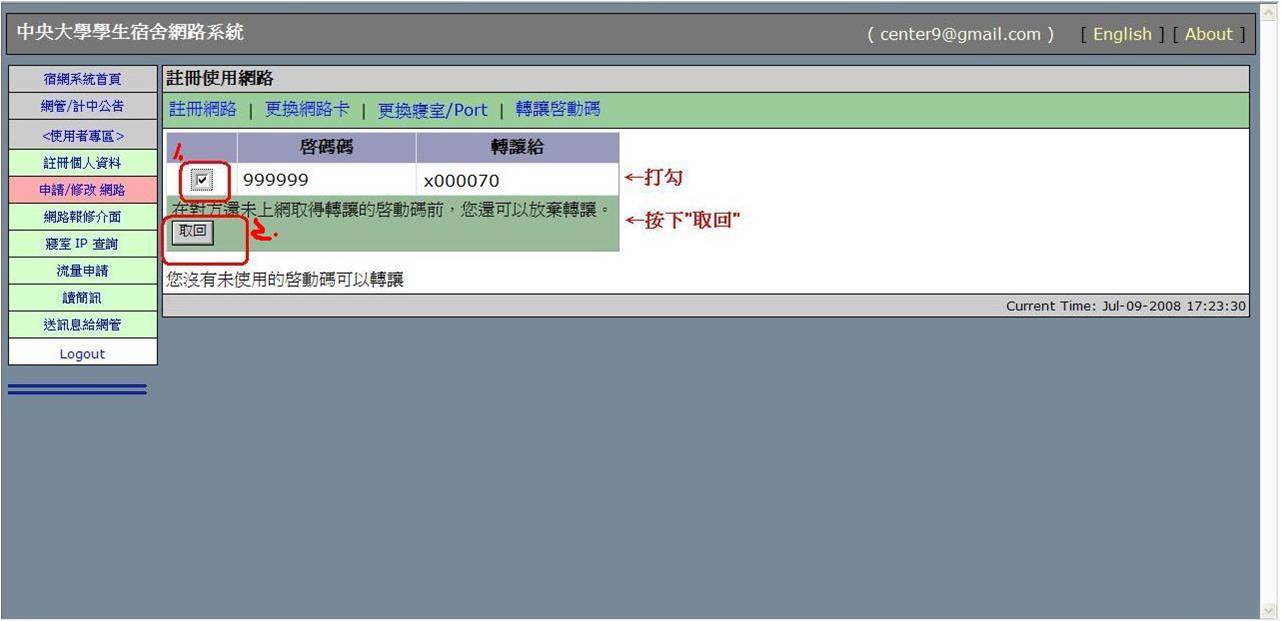
| − | ::2. | + | ::2.4 If you want to cancel the transfer, check the box and click '''OK'''. Otherwise you can skip this step. |
::[[Image:Transfer04.jpg]] | ::[[Image:Transfer04.jpg]] | ||
| − | ::2. | + | ::2.5 Make sure the student ID you transfer your network activation code to is correct before you log out. |
::[[Image:Transfer05.jpg]] | ::[[Image:Transfer05.jpg]] | ||
| − | ::2. | + | ::2.6 log in with your NCUCC SPRAC E-mail accout. |
::[[Image:Transfer06.jpg]] | ::[[Image:Transfer06.jpg]] | ||
| − | ::2. | + | ::2.7 Register for dormitory network. |
::[[Image:Transfer07.jpg]] | ::[[Image:Transfer07.jpg]] | ||
| − | ::2. | + | ::2.8 After the registration, you shall get your transfered network activation code from your short term user account. |
::[[Image:Transfer08.jpg]] | ::[[Image:Transfer08.jpg]] | ||
| − | == | + | ==Upload Quotas of Dormitory Network== |
| − | |||
| − | |||
| − | |||
| − | |||
| − | |||
| − | |||
| − | |||
| − | |||
| − | |||
| − | |||
| − | + | 1. According to NCU Dormitory Network Rules and Regulation: | |
| − | + | :*In accordance with the previous day external network traffic statistical information, the maximum upload amount permitted from an on-campus computer to an off-campus location is 3 GB per day and that does not limit the download amount.If any user exceed the limit, she/he will be restricted from using the dormitory network for three days, and increase a day with each additional of 1 GB. | |
| + | :*The rule above is not applicable to internal data transfer (i.e. data transfer within the campus). | ||
| + | :*The upload limit is expandable under any academics purpose. An application completed in details must be signed by the professor in charge or the director of the department before handing over. Applications for expanding upload limit for three days or below will need the approval of division chief of NCUCC while applications for expanding upload limit for more than three days will need the approval of the director of NCUCC. | ||
| + | :*NCUCC reserved the rights of modifying and publishing the rules above. | ||
| + | 2. Restricted IP and MAC address can be found from the links below: | ||
| + | :*Restricted IP : https://uncia.cc.ncu.edu.tw/dormnet/index.php?section=flowdel | ||
| + | :*Restricted MAC: https://uncia.cc.ncu.edu.tw/dormnet/index.php?section=lockmac | ||
=Print Service= | =Print Service= | ||
| 行 540: | 行 438: | ||
:The laser printing service is provided on a charge basis. Before using the service, please purchase a print quota: | :The laser printing service is provided on a charge basis. Before using the service, please purchase a print quota: | ||
:*Step 1:Purchase a print quota at the Administration Building. (Per purchasing which consists of 100 quota costs NTD. 100 )。 | :*Step 1:Purchase a print quota at the Administration Building. (Per purchasing which consists of 100 quota costs NTD. 100 )。 | ||
| − | :*Step 2:Get on-line to Print Service System | + | :*Step 2:Get on-line to Print Service System https://dolphin.cc.ncu.edu.tw/prtserv/index.php 。 |
:*Step 3:Select <b>Regist</b>. | :*Step 3:Select <b>Regist</b>. | ||
:*Step 4:Log-on to system with your NCUCC SPARC e-mail account. | :*Step 4:Log-on to system with your NCUCC SPARC e-mail account. | ||
| 行 550: | 行 448: | ||
:2. Print quota will be accepted in using the print service provided in terminal room only. | :2. Print quota will be accepted in using the print service provided in terminal room only. | ||
| − | == | + | ==User Guide for Print Service== |
| − | === | + | ===How to Print a Document=== |
| − | + | Login to printing service system(https://dolphin.cc.ncu.edu.tw/prtserv/index.php) with your SPARC account, as the picture below: | |
| − | |||
| − | |||
| − | |||
| − | |||
| − | |||
| − | [[Image: | + | [[Image:P1_en.jpg]] |
| − | + | Click "Print" and you will find some print jobs in "print queue". | |
| − | + | [[Image:P2_en.jpg]] | |
| + | Click on the job you want to print and confirm again, then your document will be released soon. | ||
| − | + | ※ For dot-matrix printers, you need to confirm your print job again at the printing console which is located beside the dot-matrix printers. Remember to check the status of the printers before you start printing. | |
| − | + | <b>Print Documents Outside Terminal Room</b> | |
| − | + | User can not only print documents by computers in terminal room, but also any other computers! Users don't have to bring along documents to terminal room under this service. | |
| − | + | First you have to set up the printer. Please refer to the manual guide "Setting up Printers". | |
| − | + | Print your document and login to our printing service system. As mentioned above, you may see the job in the "printing queue". | |
| − | [[Image: | + | [[Image:P2_en.jpg]] |
| − | + | The only difference is that when you select the job, an error message may appear as the picture below: | |
[[Image:p3.jpg]] | [[Image:p3.jpg]] | ||
| + | A little setup may need before you start printing. Click "Owner" and check the print job. Then click on the button "Set Owner" | ||
| − | + | [[Image:p4_en.jpg]] | |
| − | |||
| − | [[Image: | ||
| − | |||
| − | + | If success the Owner column of the printing queue change into your SPARC account. Login again to printing service system in terminal room and confirm your print job again, the document will soon to be released. | |
| − | + | (for dot-matrix printer, extra confirmation at the printing console is needed.) | |
[[Image:p5.jpg]] | [[Image:p5.jpg]] | ||
| − | ※ | + | ※ You are welcome to reach our terminal room staff on duty if you encounter any other problems not mentioned above. |
| − | |||
| − | |||
| − | |||
| − | |||
| − | |||
| − | |||
| − | |||
| − | |||
| − | |||
| − | |||
| − | + | ===Convert File Type to PDF=== | |
| + | You can convert a file into the type of PDF with our print service, but a little setup is needed. | ||
| − | + | Go to "Control Panel" and double click "Printers and Faxes". Click "Add a printer" and click "next". | |
| − | [[Image: | + | [[Image:p6_en.jpg]] |
| − | + | Select "Local printer attached to this computer" and uncheck "Automatically detect and install my plug and play printer". | |
| − | [[Image: | + | [[Image:p7_en.jpg]] |
| − | + | Check "Create a new port" and select "Standard TCP/IP Port" | |
| − | [[Image: | + | [[Image:p8_en.jpg]] |
| − | + | A new window "Add Standard TCP/IP Printer Port Wizard" will pop up. | |
| − | [[Image: | + | [[Image:p9_en.jpg]] |
| − | + | Enter IP address for the printer, which is 140.115.195.7 | |
| − | [[Image: | + | [[Image:p10_en.jpg]] |
| − | + | We will now configure port information. Check "Custom" and click "Settings". | |
| − | [[Image: | + | [[Image:p11_en.jpg]] |
| − | + | Check "LPR" for protocol and fill in the field "Queue Name" with "pdf". Check "LPR Byte Counting enable" as well. Then Click "OK". | |
| + | [[Image:p12_en.jpg]] | ||
| − | + | If success a port configuration completing wizard will pop up. | |
| − | + | [[Image:p13_en.jpg]] | |
| − | + | Next, you will have to choose a printer installation software. We sugget Apple Color Printer series, for example Apple Color LW 12/660 PS. | |
| − | + | [[Image:p14_en.jpg]] | |
| − | + | You may enter"PDF" for printer name. | |
| − | + | [[Image:p15_en.jpg]] | |
| − | + | Configuration is done and you may start using the pdf converter. | |
| − | + | [[Image:p16_en.jpg]] | |
| − | [[Image: | + | Print your document with the newly-configured pdf converter, and login to print service system. Confirm print job again in the printing queue. |
| + | [[Image:p17_en.jpg]] | ||
| − | + | Click "pdf" at the left menu list and you shall see your file has been converted into pdf file. You can choose to download or delete the file. | |
| − | [[Image: | + | [[Image:p18_en.jpg]] |
| − | |||
| − | |||
{{Languages|新生必讀文件}} | {{Languages|新生必讀文件}} | ||
於 2023年11月20日 (一) 08:55 的最新修訂
目錄
- 1 Terminal Room
- 2 NCU Mail
- 3 Dormitory Network
- 3.1 Rules and Regulations
- 3.2 How to Apply
- 3.3 Purchase a Network Activation Code
- 3.4 Apply For a Short Term Account(For User Without NCUCC SPARC E-mail Account)
- 3.5 Differences Between The Status of 'Registered' and 'Activated' in Dormitory Network System
- 3.6 DHCP (Dynamic Host Configuration Protocol)
- 3.7 Preparing For Setting Up Dormitory Network
- 3.8 Register Your Personal Information On-line:
- 3.9 Network Configuration
- 3.10 Transfer a Network Activation Code (From Short Term User Account to Permanent NCUCC SPARC E-mail Account)
- 3.11 Upload Quotas of Dormitory Network
- 4 Print Service
Terminal Room
As a freshman of National Central University, everything around here must be new and fresh to you! National Central University Computer Center (NCUCC) with various services is a good helper for every student, especially for those who are new to here. If you have any of the following questions: Where can I get online? Where can I print or scan my works? What resources do NCU have? Maybe you will need to get known with NCUCC. Please take a look around and find out what services do we provide.
Services
- 1.Terminal Room:About 100 computers are available for staffs and students of NCU. For temporary user, you must take a short registration at our Service Desk before using our computer. Two different types of operating system, Microsoft Windows XP and Ubuntu Linux, are pre-installed.
- 2.Service Counter in Terminal Room:
- Trained professional students are in charge of environment supervision and any services provided in terminal room.
- For any other services, please refer to ServiceDesk

- 3.Printing Service:Two matrix-dot printers, two black-and-white laser printers and a color laser printer are now available in terminal room.
- 4.Scanning Service:A scanner is now available in terminal room.
Location
- The location of terminal room: terminal room is located at the ground floor of Zhi-Xi Hall. Turn right after entering the main entrance of Zhi-Xi Hall and you will see terminal room.
- Map Guide: The Location of Zhi-Xi Hall.

- Zhi-Xi Hall

- A Closer Look of Zhi-Xi Hall

- Main Entrance of Computer Center

- Terminal Room

Service Hours
  1.  Regular Service Hours:
     Monday ~ Friday : 08:00 - 23:00
     Weekends and Holidays: 09:00 - 16:00
  2. Winter/Summer Vacations:
     Monday ~ Friday : 08:00 - 17:00
     Weekends and Holidays: 09:00 - 16:00
  3. Holidays:
     Computer Center is closed at Dragon Boat Festival, Moon Festival, and Chinese New Year.
  4. Special Occasions:
     Computer Center is closed at specaial occasions such as power failure, cleaning and other occasions.
Get Access to The Computers
- Staffs and Students of NCU have high priority in using the computers.When a computer is booted, a login program will appear automatically and request for user ID and password.
- For students and staffs of NCU, please login with your own SPARC E-mail account.
- For guests, please bring along your ID card and take a short registration at Service Desk to get a temporary login account.
Rules and Regulations
- No food and drinks are allowed.
- No PC games are allowed.
- No Peer-to-Peer softwares are allowed.
- No abuse acts and illegal activities are allowed.
- Users with non work-related tasks, such as BBS and IRC, will have lower priority in using the computers.
- Please keep the desk clean.
- Please shut down the computer properly and push the chair back after usage.
NCU Mail
Dormitory Network
Rules and Regulations
- Dormitory network is provided under the purpose of academics only. Any commercial or abuse acts are strictly prohibited and users must obey the rules and regulations of Taiwan Academic Network (TANet) as well.
- If any error has occurred and further affect the whole dormitory network because of the improper use of the user, one's network connection will be disposed of off-line until the problem is fixed.
- User should comply with all deployment and disposal given by authorised network administrator.
- As one of the users of TANet, one is required to comply with the rules below:
- Network resources of TANet must be used under the purpose mentioned in "rules and regulations of TANet" only.
- It is forbidden to use network resources of TANet for transferring any menacing, obscene, offensive or commercial data.
- It is forbidden to use network resources for mass mailing, mail bombing, sending spam, spreading viruses and users are not allowed to provide the means to the third parties to perform similar acts.
- Any resources from the internet belong to the authorised parties. TANet users are forbbiden to access those resources unless any official permission or authorization is obtained.
- 「Rules and Regulation of National Central University Networking 」
How to Apply
From the opening date of dormitory, students using the dormitory network must fill out the application form on-line for using the network. An extra fee is required because it is not included in essential educational, research, admission principles. During September 5, 2002, the administration council has made the following agreement: Starting from 2003 academic year, users of the dormitory network will be required to pay a fee of 800 NTD for each MAC Address; the fee is for the expenses of the network administrator for each dorm and other supplies. Fee will be accepted after the network administrator of the dorm is selected.
Purchase a Network Activation Code
- Location: Cashier Center at The Administration Hall
- Fee:NTD$ 800 each.
- Purchasing period:
- First Semester:Can be purchased from the summer vacation(please check the annoucement from NCUCC website) until the end of the first semester.
- Second Semester:Can be purchased from the winter vacation(please check the annoucement from NCUCC website) until the end of the second semester.
- Valid Time:According to our current policy, a network activation code is valid until winter vacation for first semester and is valid until summer vacation for second semester.
Apply For a Short Term Account(For User Without NCUCC SPARC E-mail Account)
- Short term user account can be applied by user without NCUCC SPARC e-mail account only(usually for short term students who do not have student ID card).
- Purpose:
- Used as a temporary log-in account of Dormitory Network System.
- A network activation code of NTD 800 is required for enabling dormitory network regardless to the using period(that is, you still need a network activation code even if you want to use dormitory network for a week, two weeks, or a month only).
- Procedure for applying short term user account:
- 3.1 Connect to Dormitory Network system and click Short Term User
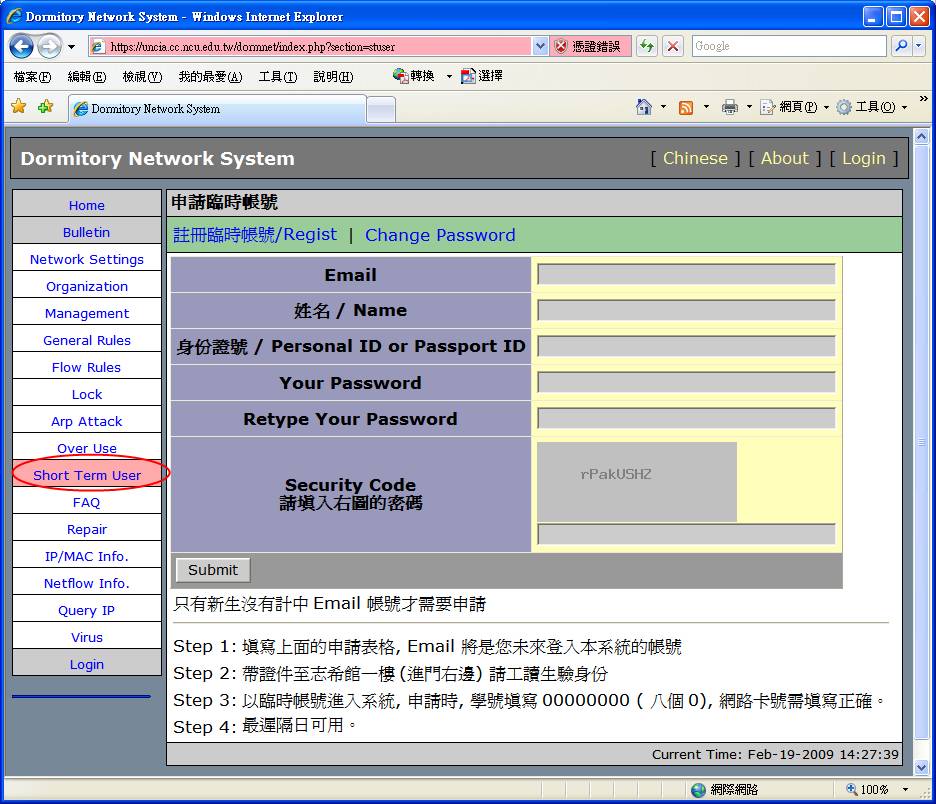

- 3.2 Fill in all required information and click submit.
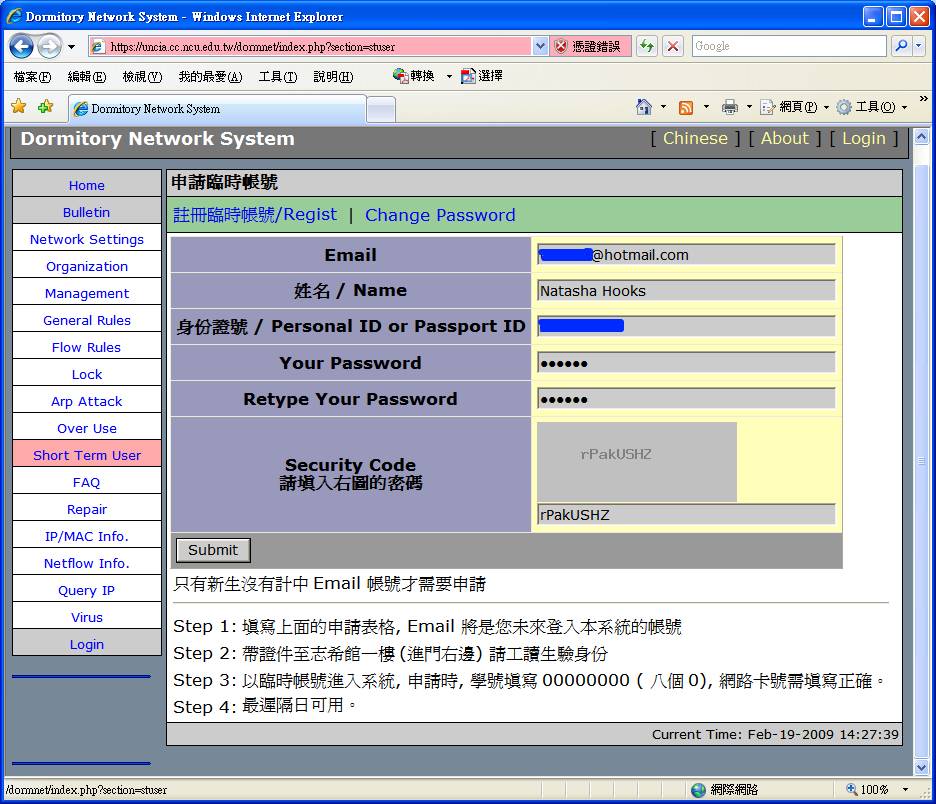

- 3.3 Success
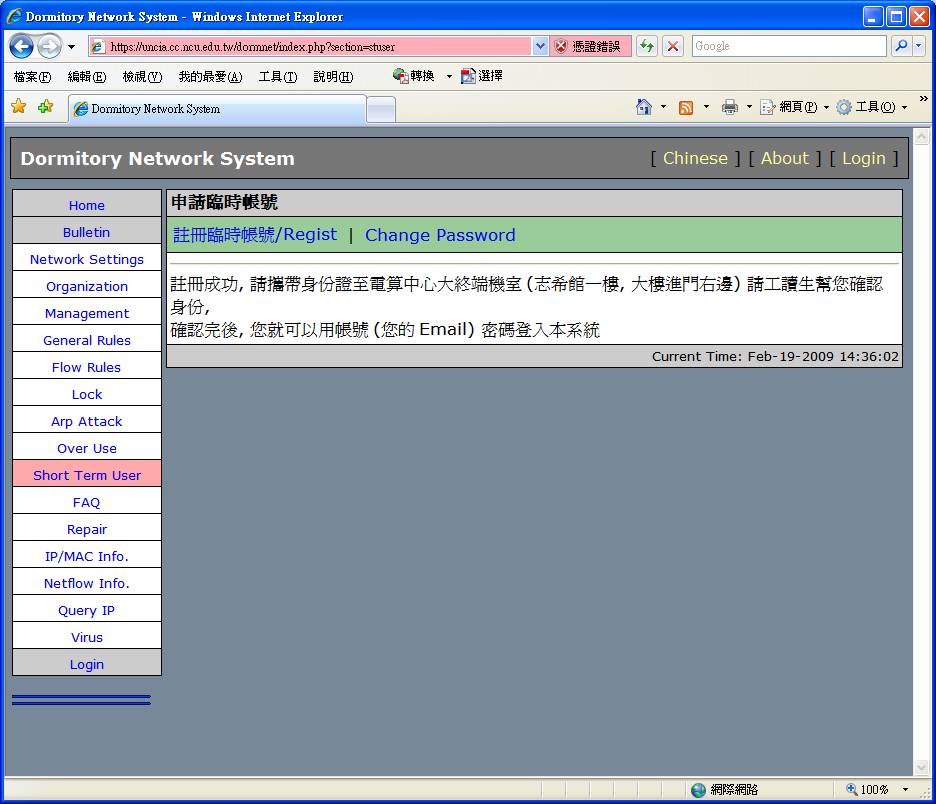

- 3.4 Verification:
- Verification is required before your short term user account can be validated. Please bring your indentity card or passport(depends on the ID no. or passport no. you have filled in just now) and come to the Service Desk of Computer Center(at Zhi-Xi Hall). Service staff on duty will validate your short term account right after the verification.
Differences Between The Status of 'Registered' and 'Activated' in Dormitory Network System
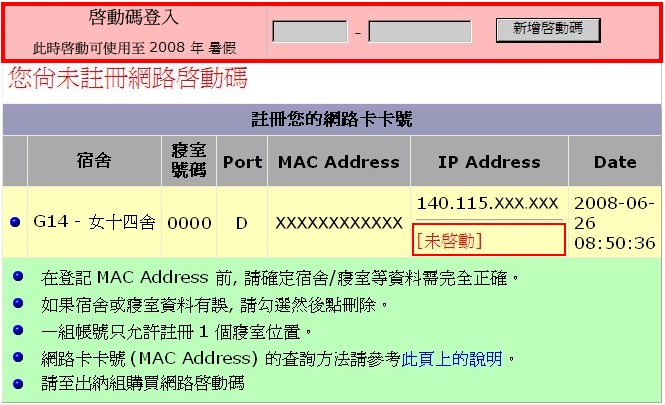
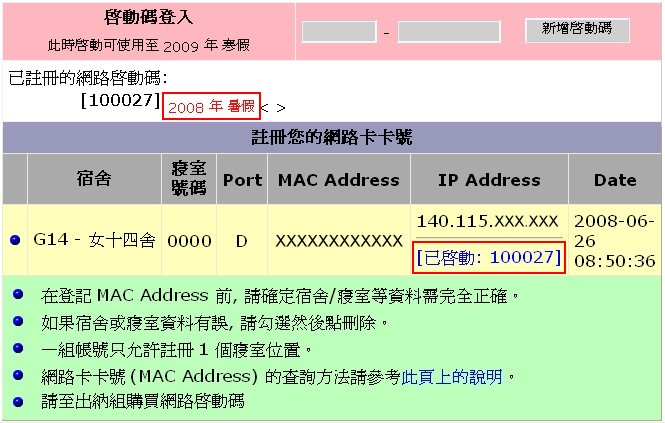
- 'Registered':
- Definition:Once a person finish the registration (including personal information, dormitory information and MAC address) on Dormitory Network System, the status is shown as 'registered'.
- To enable dormitory network, your status must be 'registered'.
- 'Activated':
- Definition:Once a person finish the activation (that is, register a network activation code) on Dormitory Network System, the status is shown as 'activated'.
- The status of 'activated' show that you has paid the fee for dormitory network.
- Your status must be 'registered' before you change to 'activated'.
- Grace Period of disabling dormitory network:
- After one or two weeks after the school opening date:
- Required status: registered
- Dormitory network is enabled under 'registered' status and proper network setting.
- The main purpose of giving this grace period is to avoid the congestion that may be caused by excessive students buying network activation codes in a short period.
- During semester or winter/summer vacation:
- Required status: registered and activated
- Please notice the announcement of the accurate grace period ended date of dormitory network from NCUCC website.
- After one or two weeks after the school opening date:
- There are only two statuses in Dormitory Network System: 'registered' and 'registered and activated'.
- It takes time to activate your dormitory network connection even though you have registered a network activation code. To avoid inconvenience, please register your network activation code before the end of grace period.
DHCP (Dynamic Host Configuration Protocol)
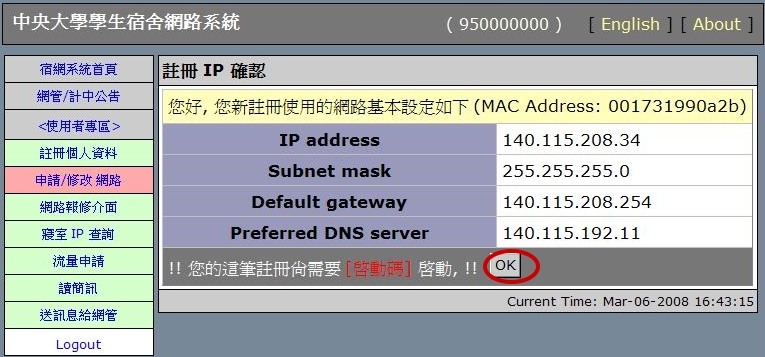
- Purpose: With obtaining an IP address automatically, you are able to connect to Dormitory Network System before his/her dormitory network has been activated. After activating his/her dormitory network, you will obtain a unique IP address which should be used in the whole semester.
- The IP address obtained automatically has limited connection, that is, you can connect to Dormitory Network System only.
- The function "Dormitory IP Query" has been canceled.
- After the dormitory network is activated, you will obtain a unique IP address and related settings information. Please write down all the given settings and refer to section #Network_Configuration.
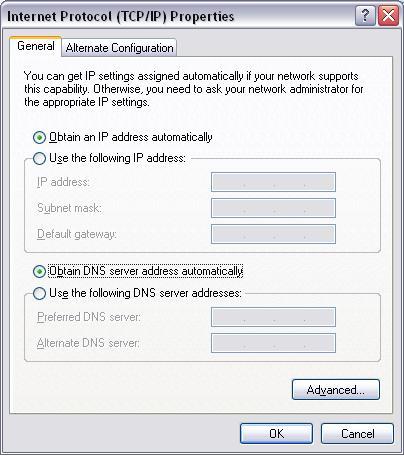
- Configuration: obtain an IP address automatically
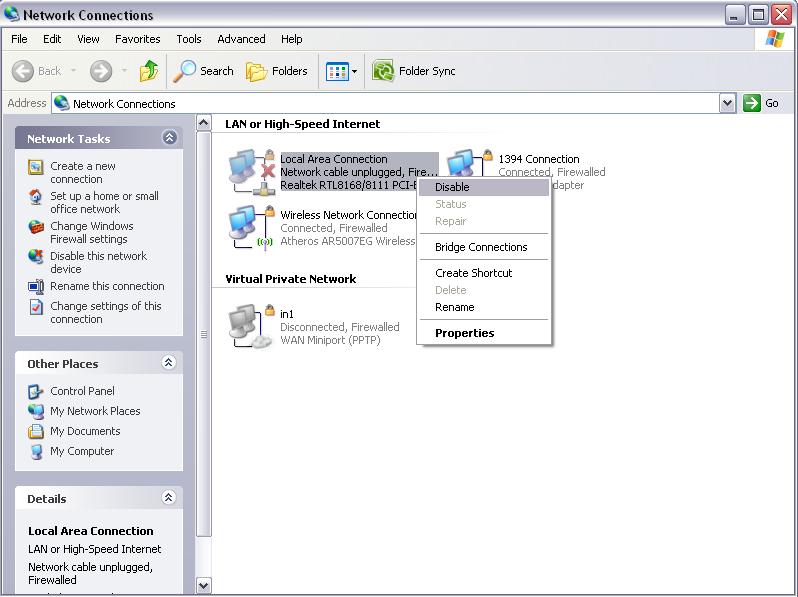
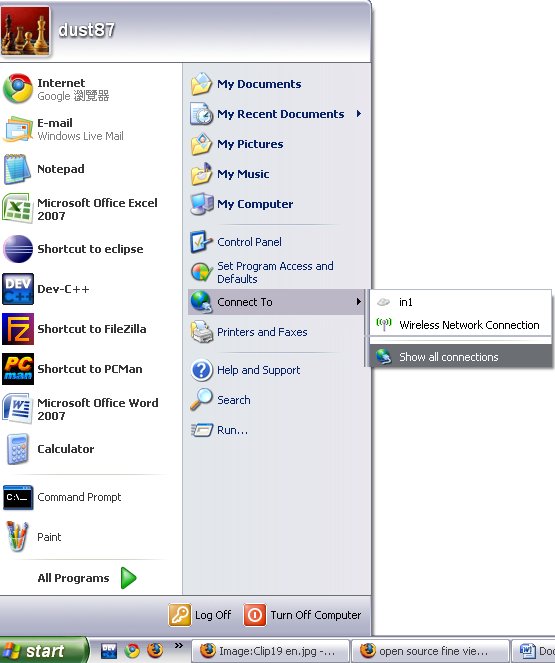
- 5.1 Click Windows Start> Connect To> Show All Connection
- 5.2 Right click Local Area Connection and select properties
- 5.2.1 select TCP/IP
- 5.2.2 click properties


- 5.2 Check Obtain an IP address automatically and Obtain DNS server address automatically, and click ok

- 5.3 Right click Local Area Connection and left click Disable. After that, right click Local Area Connection and click Enable again.

- 5.4 Configuration done.
Preparing For Setting Up Dormitory Network
1. Apply for NCUCC SPARC E-mail Account:
- NCUCC SPARC E-mail account is used as the log-in account for our Dormitory Network System. You have to register your personal information for applying for dormitory network. For freshmen, please log-on to Freshman Account Applying Interfaceto apply for your NCUCC SPARC e-mail account.
2.Purchase and install the network adapter and wire:
- A general network adapter and RJ-45 wire is needed. Plug in your hardware device and follow the set up instructions from user manual.
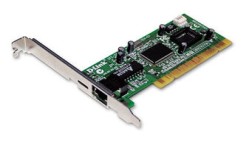

Network Adapter RJ-45 Wire


- After setting up network adapter, please plug the wire into the socket placed on the wall of your dormitory room.
- If you have installed the driver of network adapter properly, the next step you have to take is to confirm that your Microsoft Windows Operating System has detected the network adapter.
3. Check your Media Access Control address (MAC address):
- When you are applying for dormitory network, you have to provide your MAC address. To check your MAC address, please refer to the steps below(categorize by Windows XP and Windows Vista):
- For WinXP, you can check your MAC address by the following steps:
- Click Windows Start>All Programs>Accessories>Command Prompt:

- Type ipconfig/all in the command prompt window:

- the result is shown below:

- Physical Address is equivalent to MAC address. We will need this value for further registration.
- For Windows Vista, you can check your MAC address by the following steps:
- Click Start-> All Programs-> Accessories-> Command Prompt, as the picture below:

- Type ipconfig/all in the command prompt window:

- the result is shown below:
- Physical Address is equivalent to MAC address (etc. :001731B3521E)
- Please note that the accurate MAC address we needed should be in the same section with IPv4 address instead of IPv6 address.

- Write down MAC address as we will need this value for further registration.
4.Connect to Dormitory Network System:
- Please check the internet socket port of your dormitory room before you connect to Dormitory Network System. The internet socket port is placed on the wall near your desk and is usually labeled as A, B, C or D.
- You can connect to Dormitory Network System by the ways below:
- 4.1 Connect to Dormitory Network System from your limited dormitory network connection. For further information, please refer to Chapter 3.6 of this documentation Obtain an IP Address Automatically.
- 4.2 Find any computers with internet connection: You can log-on to Dormitory Network System with any computers that can access internet websites.
5. Make sure that there is a Network Administrator in your Dormitory:
- Please connect to the URL: http://www.cc.ncu.edu.tw/studdorm/ to make sure that the network administrator at your dormitory has been selected, otherwise you may not be able to use the dormitory network connection.
6. Purchase a Network Activation Code:
- Please buy a network activation code(NTD 800 each) via the cashier center at the Administration Hall.(A network activation code of previous semester are still accessible during winter and summer breaks)。
- After finishing the steps above, please get on-line and finish the last registration.
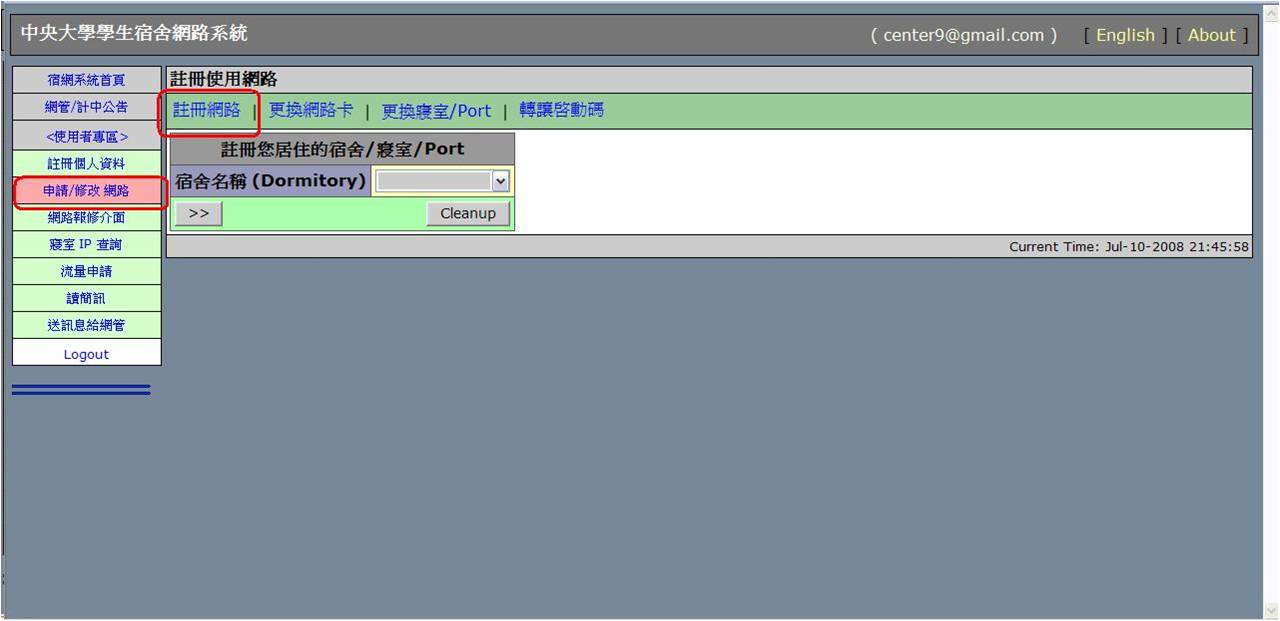
Register Your Personal Information On-line:
a.Personal Information
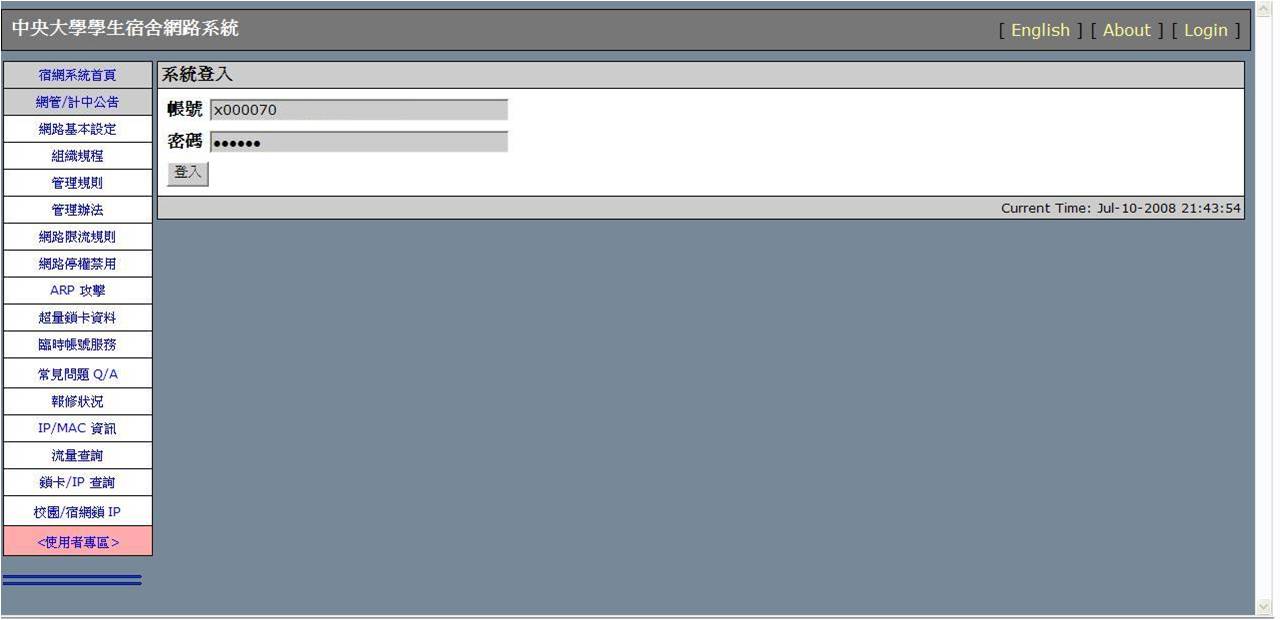
- 1. Connect to Dormitory Network System(https://uncia.cc.ncu.edu.tw/dormnet/ ) and click Log-in.
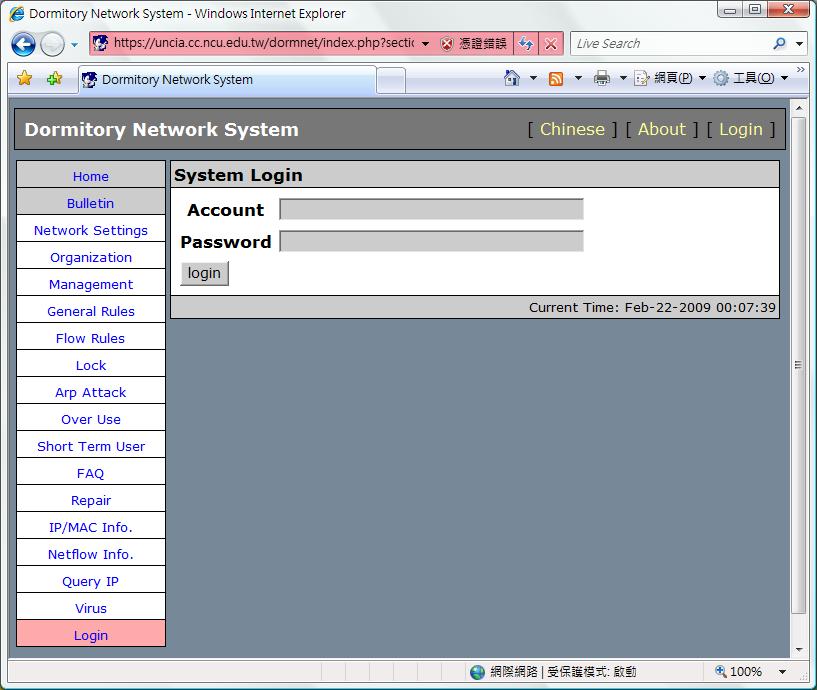

- 2. Log-in to system with your NCUCC SPARC E-mail Account.
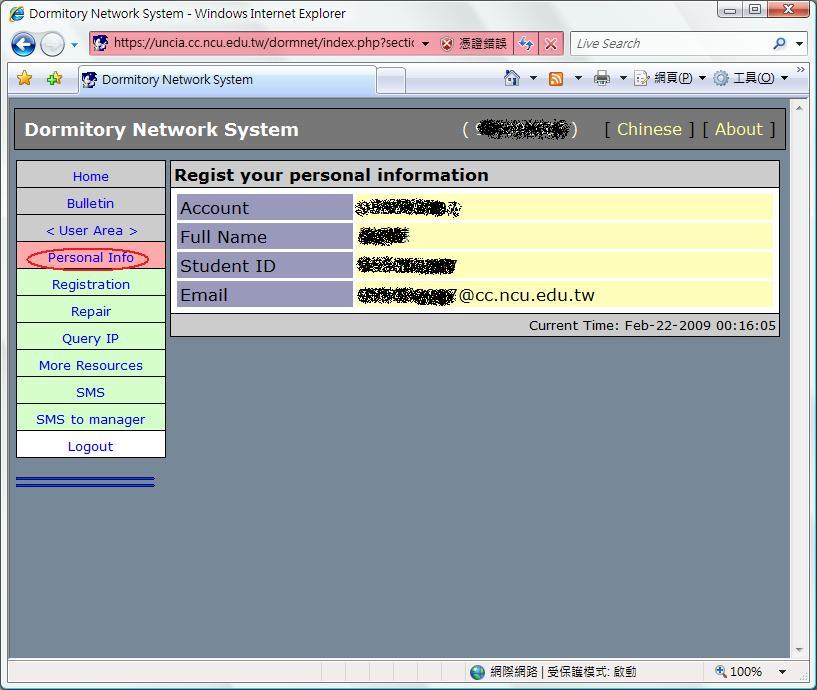
- 3. Click Personal Info and fill in your personal information.

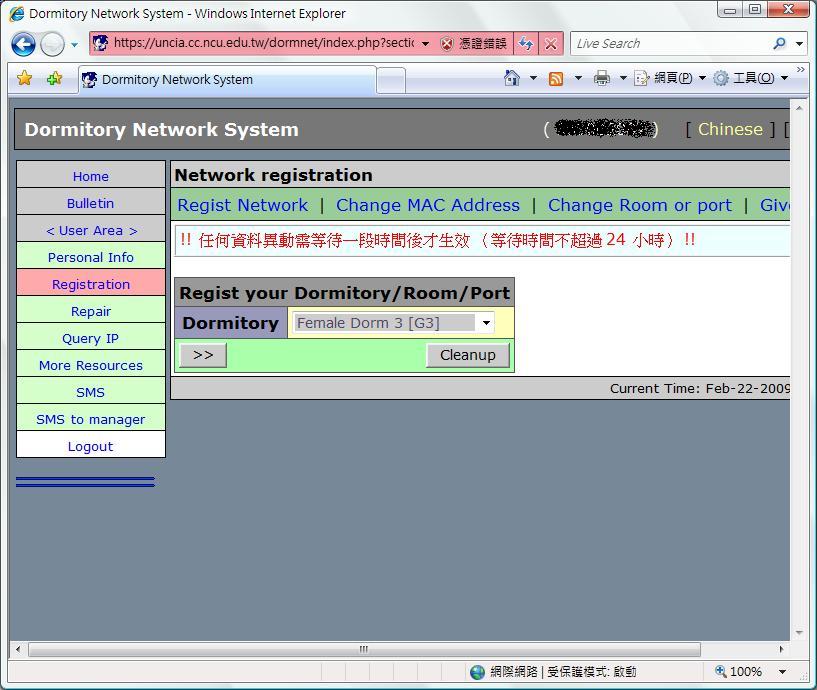
- 4. Click Registration. Follow the instructions shown on website and fill in all required information.

- 5. After filling all information, click Save and Change. The System will prompt you a confirmation message, please check again your information before clicking OK.


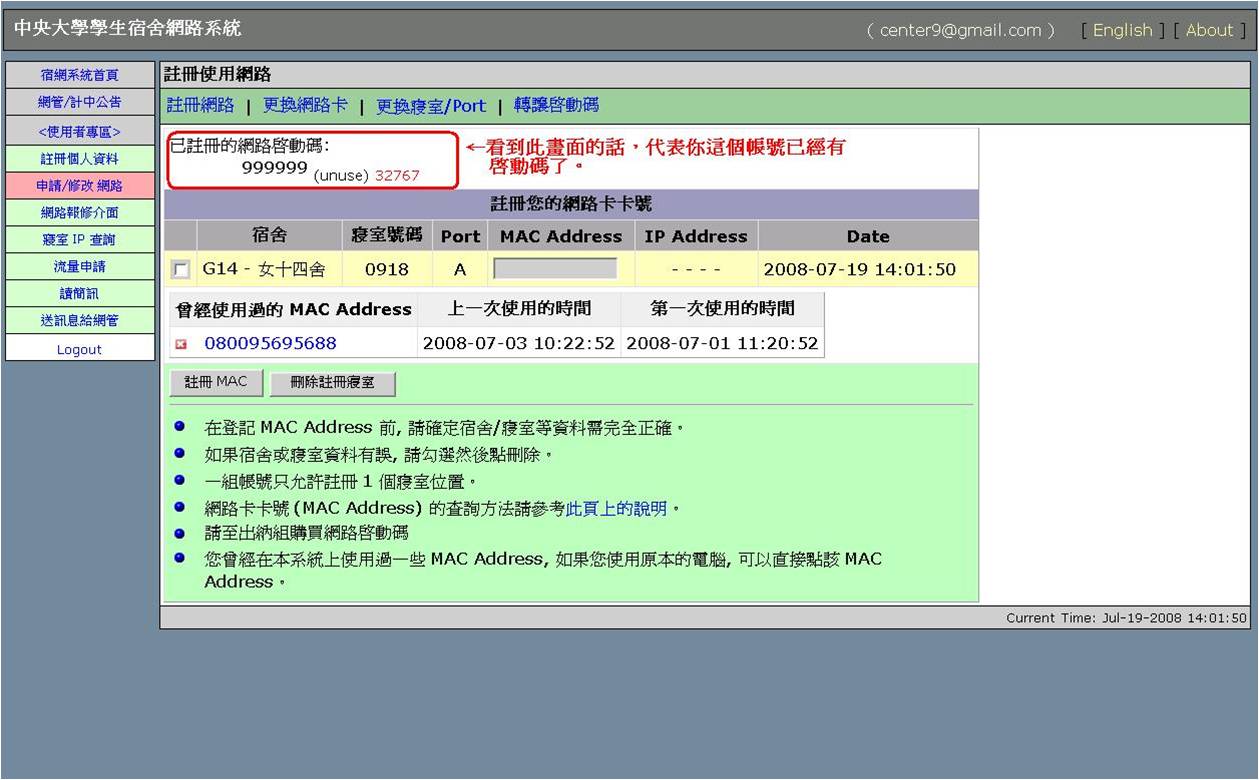
b.Register Your MAC Address
- 1. Connect to Dormitory Network System(https://uncia.cc.ncu.edu.tw/dormnet/ ) and click Log-in.
- 2. Log-in to system with your NCUCC SPARC E-mail Account.
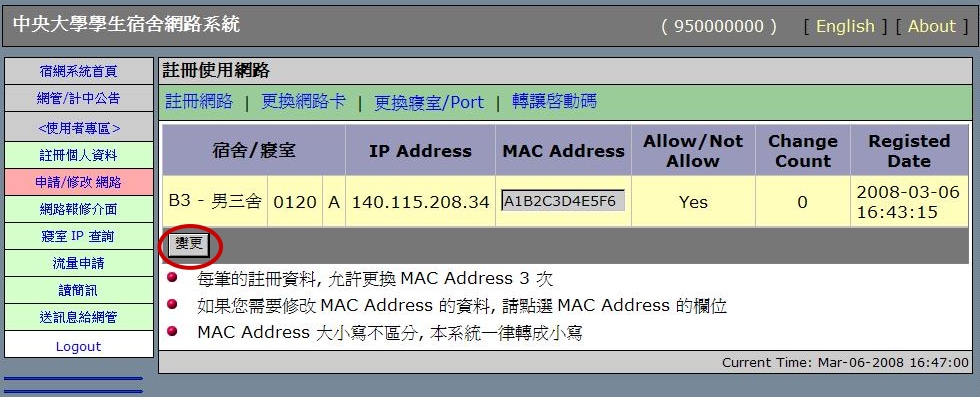
- 3. Click Registration. You will see a field labeled as MAC Address, please fill in with your MAC address.
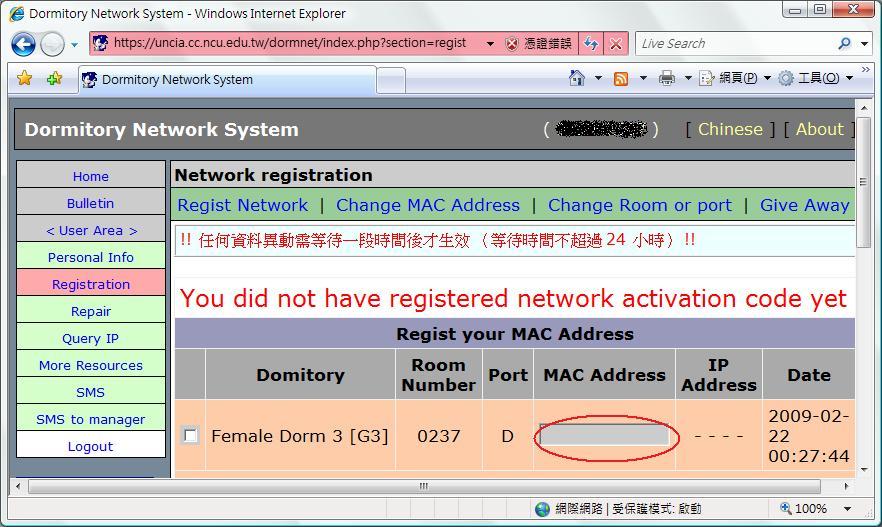

- 4. After registering your MAC address, you will get your own IP address.

c. Register a Network Activation Code
- 1. Connect to Dormitory Network System(https://uncia.cc.ncu.edu.tw/dormnet/ ) and click Log-in.
- 2. Log-in to system with your NCUCC SPARC E-mail Account。
- 3.Click <b>Registration and register your network activation code.


- 4.Your activation code is successfully registered.

d. Change Your MAC Address
- 1. Connect to Dormitory Network System(https://uncia.cc.ncu.edu.tw/dormnet/ ) and click Log-in.
- 2. Log-in to system with your NCUCC SPARC E-mail Account.
- 3. Click Registration, then click Change MAC Address.
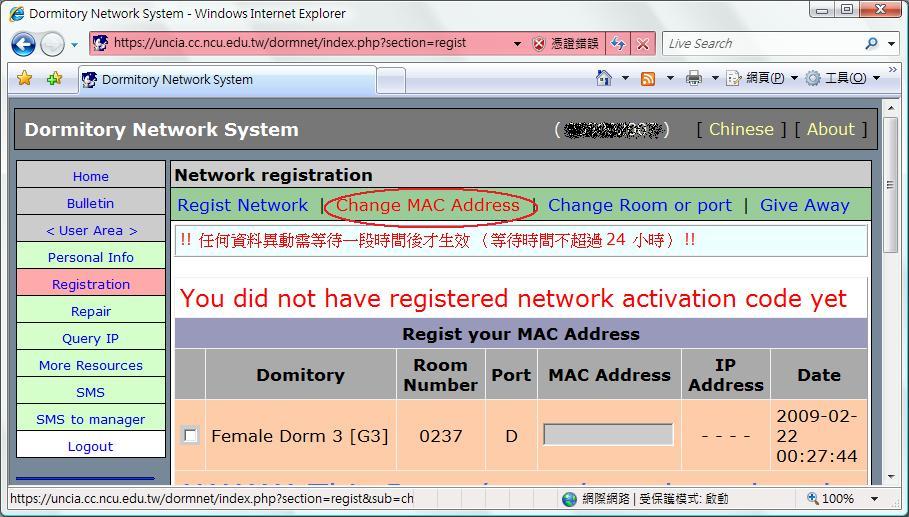

- 4. Fill in new MAC address and click Change.

e. Change Room/ Port information
- 1. Connect to Dormitory Network System(https://uncia.cc.ncu.edu.tw/dormnet/ ) and click Log-in.
- 2. Log-in to system with your NCUCC SPARC E-mail Account.
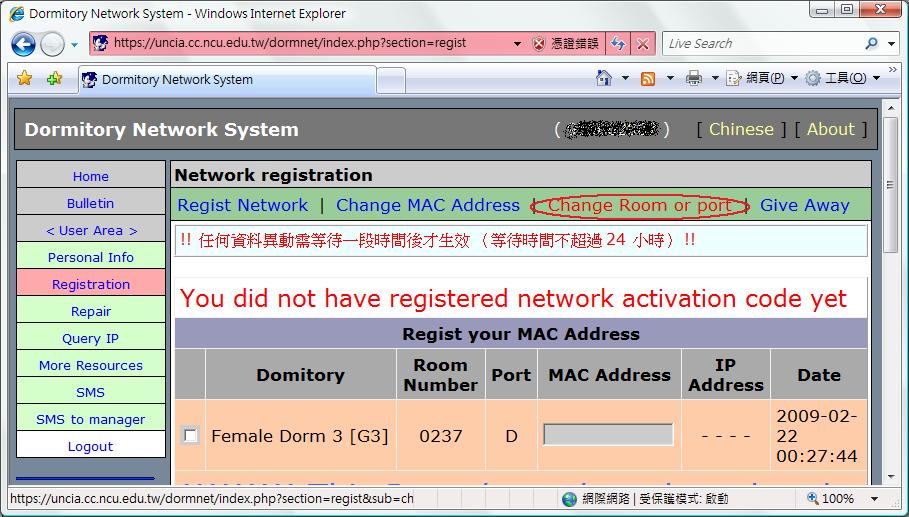
- 3. Click Registration, then click Change Room or Port.

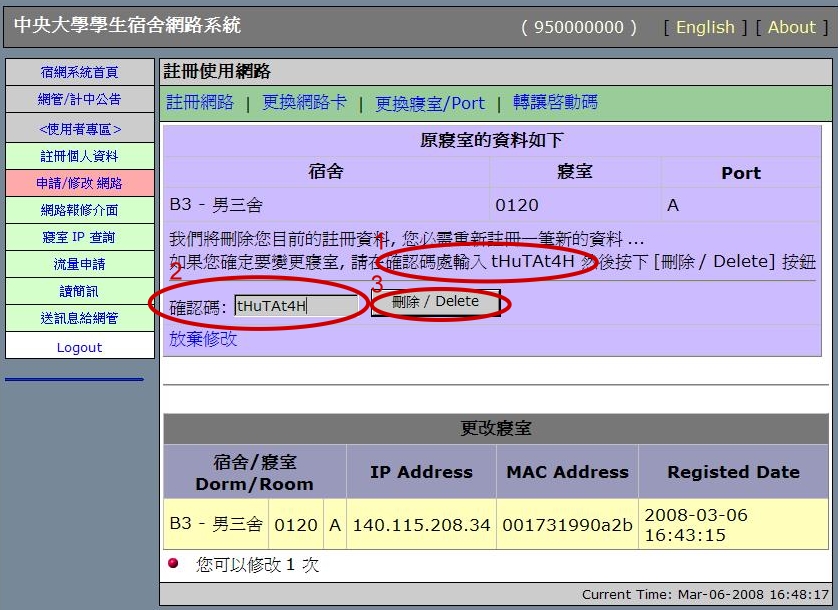
- 4. Enter Confirmation Code and click Delete.

Network Configuration
- a. WinXP
- Click Windows Start>Connect To>Show All Connection:

- Right click Local Area Connection and select properties:
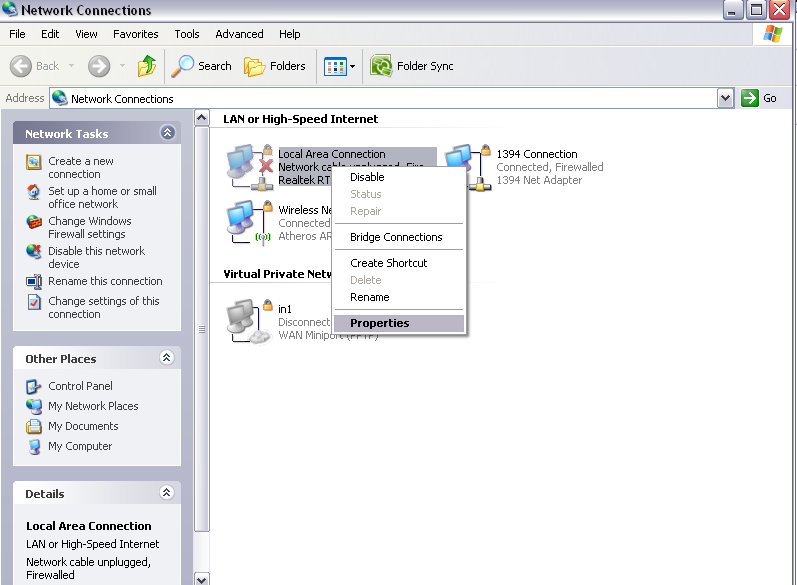

- Click TCP/IP, and click properties :
- IP configuration: Enter the unique IP and settings information which is obtained after activating your dormitory network. (A person should have a unique IP. Please make sure you configure your IP correctly)
- Configure Subnet mask as the picture below. The third column of Default gateway have exactly the same value with the third column of IP address
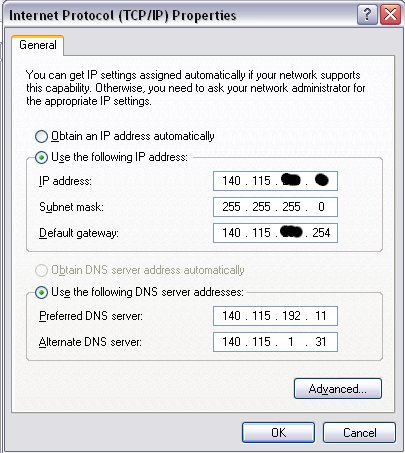

- Click OK and reboot your computer.
- Cofiguration done.
- b. Windows Vista
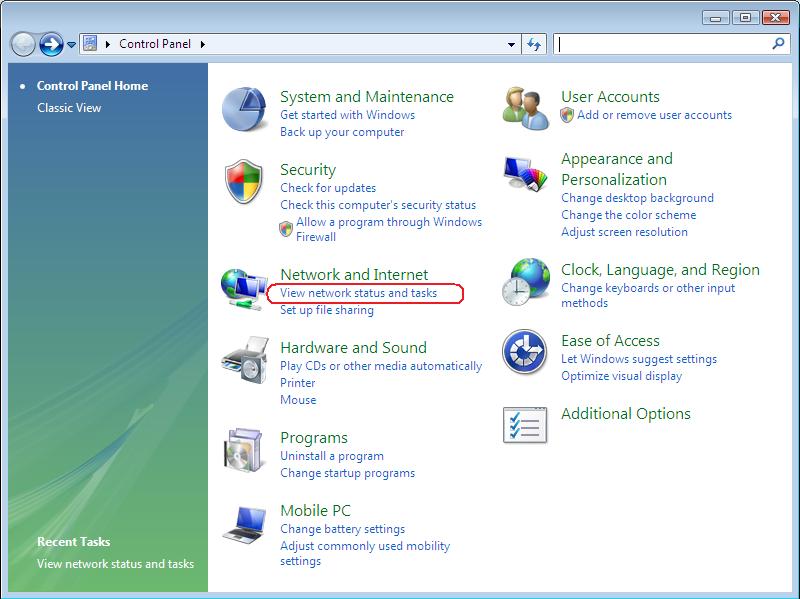
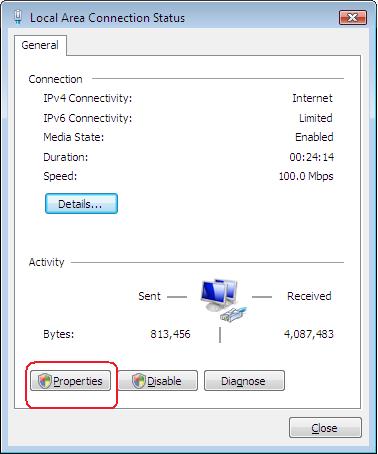
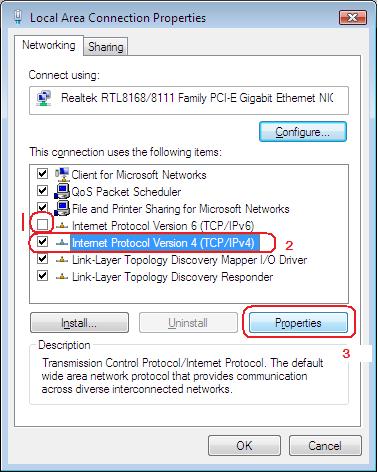
- Click Windows Start>Control Panel>View Network Status and Task:

- Click View Status:
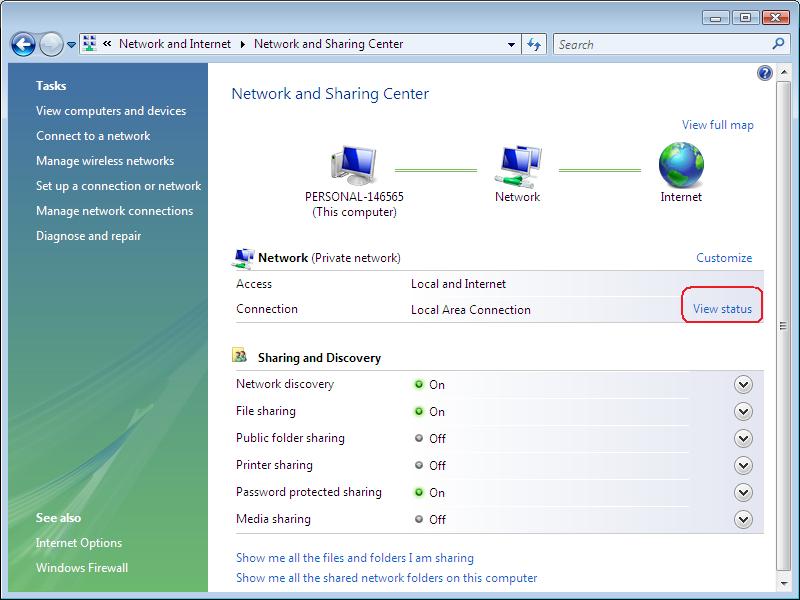

- Click Properties:

- 1.Do not tick Internet Protocol Version6(TCP/IPv6), and tick Internet Protocol Version4(TCP/IPv4)
- 2.Click once on Internet Protocol Version4(TCP/IPv4)
- 3.Click Properties

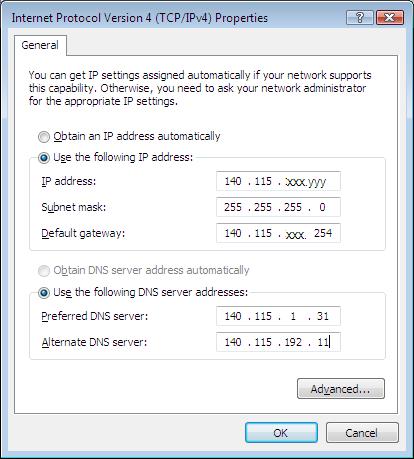
- IP configuration: Enter the unique IP and settings information which is obtained after activating your dormitory network. (A person should have a unique IP. Please make sure you configure your IP correctly)
- Configure Subnet mask as the picture below. The third column of Default gateway have exactly the same value with the third column of IP address

※It takes about a day to activate your dormitory network after all configuration is done. If you do not complete all configurations within grace period, your network may be restricted in use. If so, get your MAC address and come to our terminal room, and you can finish all procedures needed for activating dormitory network at our terminal room.
If all registrations and configurations are done, your dormitory network should be activated within a day. Please note that your dormitory network will never been activated immediately. It takes time!
Transfer a Network Activation Code (From Short Term User Account to Permanent NCUCC SPARC E-mail Account)
- Restriction on Use:
- You are allowed to transfer a network activation code from short term user account to permanent NCUCC SPARC E-mail Account only.
- If you have registered for dormitory network by using short term user account(that is, you have registered dormitory number, port number on Dormitory Network System), you have to delete all the information registered in your short term user account (for following procedure, please refer to 3.8.5.e Change Room and Port Information). Only by doing so can you register the same information again in your new permanent SPARC E-mail account.
- All the registered information of summer or winter vacation shall be reset during school opening period. You are suggested to transfer your network activation code after school opened.
- Procedure of transfering a network activation code:
- 2.1 Sign in Dormitory Network System with your short term user account. Click <User Area> >Registration>Give Away

- 2.2 Enter the student ID you wish to tranfer to, then click Give Away

- 2.3 If you enter wrong student ID, you can cancel the transfer before you log out.

- 2.4 If you want to cancel the transfer, check the box and click OK. Otherwise you can skip this step.

- 2.5 Make sure the student ID you transfer your network activation code to is correct before you log out.

- 2.6 log in with your NCUCC SPRAC E-mail accout.

- 2.7 Register for dormitory network.

- 2.8 After the registration, you shall get your transfered network activation code from your short term user account.

Upload Quotas of Dormitory Network
1. According to NCU Dormitory Network Rules and Regulation:
- In accordance with the previous day external network traffic statistical information, the maximum upload amount permitted from an on-campus computer to an off-campus location is 3 GB per day and that does not limit the download amount.If any user exceed the limit, she/he will be restricted from using the dormitory network for three days, and increase a day with each additional of 1 GB.
- The rule above is not applicable to internal data transfer (i.e. data transfer within the campus).
- The upload limit is expandable under any academics purpose. An application completed in details must be signed by the professor in charge or the director of the department before handing over. Applications for expanding upload limit for three days or below will need the approval of division chief of NCUCC while applications for expanding upload limit for more than three days will need the approval of the director of NCUCC.
- NCUCC reserved the rights of modifying and publishing the rules above.
2. Restricted IP and MAC address can be found from the links below:
- Restricted IP : https://uncia.cc.ncu.edu.tw/dormnet/index.php?section=flowdel
- Restricted MAC: https://uncia.cc.ncu.edu.tw/dormnet/index.php?section=lockmac
Print Service
Print Service of NCUCC
1. NCUCC currently provides three types of printer in terminal room:
- Dot-matrix printer, free for faculty, staff and students of NCU.
- Black-and-White laser printer, provided on a charge basis (NTD. 1/ per page).
- Color laser printer, provided on a charge basis as well (NTD. 5/ per page).
2. Fee for Print Service:
- The laser printing service is provided on a charge basis. Before using the service, please purchase a print quota:
- Step 1:Purchase a print quota at the Administration Building. (Per purchasing which consists of 100 quota costs NTD. 100 )。
- Step 2:Get on-line to Print Service System https://dolphin.cc.ncu.edu.tw/prtserv/index.php 。
- Step 3:Select Regist.
- Step 4:Log-on to system with your NCUCC SPARC e-mail account.
- Step 5:Register the quota code you have just purchased.
3. Notice:
- 1. NCUCC SPARC e-mail account is a must for using our print service.
- 2. Print quota will be accepted in using the print service provided in terminal room only.
User Guide for Print Service
How to Print a Document
Login to printing service system(https://dolphin.cc.ncu.edu.tw/prtserv/index.php) with your SPARC account, as the picture below:

Click "Print" and you will find some print jobs in "print queue".

Click on the job you want to print and confirm again, then your document will be released soon.
※ For dot-matrix printers, you need to confirm your print job again at the printing console which is located beside the dot-matrix printers. Remember to check the status of the printers before you start printing.
Print Documents Outside Terminal Room
User can not only print documents by computers in terminal room, but also any other computers! Users don't have to bring along documents to terminal room under this service.
First you have to set up the printer. Please refer to the manual guide "Setting up Printers".
Print your document and login to our printing service system. As mentioned above, you may see the job in the "printing queue".
The only difference is that when you select the job, an error message may appear as the picture below:

A little setup may need before you start printing. Click "Owner" and check the print job. Then click on the button "Set Owner"

If success the Owner column of the printing queue change into your SPARC account. Login again to printing service system in terminal room and confirm your print job again, the document will soon to be released. (for dot-matrix printer, extra confirmation at the printing console is needed.)

※ You are welcome to reach our terminal room staff on duty if you encounter any other problems not mentioned above.
Convert File Type to PDF
You can convert a file into the type of PDF with our print service, but a little setup is needed.
Go to "Control Panel" and double click "Printers and Faxes". Click "Add a printer" and click "next".

Select "Local printer attached to this computer" and uncheck "Automatically detect and install my plug and play printer".

Check "Create a new port" and select "Standard TCP/IP Port"

A new window "Add Standard TCP/IP Printer Port Wizard" will pop up.

Enter IP address for the printer, which is 140.115.195.7

We will now configure port information. Check "Custom" and click "Settings".

Check "LPR" for protocol and fill in the field "Queue Name" with "pdf". Check "LPR Byte Counting enable" as well. Then Click "OK".

If success a port configuration completing wizard will pop up.

Next, you will have to choose a printer installation software. We sugget Apple Color Printer series, for example Apple Color LW 12/660 PS.

You may enter"PDF" for printer name.

Configuration is done and you may start using the pdf converter.

Print your document with the newly-configured pdf converter, and login to print service system. Confirm print job again in the printing queue.

Click "pdf" at the left menu list and you shall see your file has been converted into pdf file. You can choose to download or delete the file.
